OpenStack nova network multihost with external gateway. Solving a metadata issue in Kilo. The power of ebtables.

In a recent project we found the issue that the metadata service running on the compute node was not reachable by the VMs running on it.

In the project we use Ubuntu 14.04.3 and vanilla OpenStack (kilo). The implementation uses nova network (with VLANs) in multihost mode with an external gateway for each VLAN. The latter can be achieved by:

  • configuring nova in /etc/nova/nova.conf with the option:

dnsmasq_config_file=/etc/dnsmasq-nova.conf

  • and by supplying a file /etc/dnsmasq-nova.conf where you give the external gateway configuration for the different networks (demo-net, demo2.net in the following example):

dhcp-option=tag:demo-net,option:router,10.44.1.1
dhcp-option=tag:demo2-net,option:router,10.44.2.1

In our configuration the VMs are not able to reach the metadata service when being provisioned. In other words 169.254.169.254:80 is not properly DNATed to hypervisor_IP:8775 for the VM.

The underlying reason is that since the VM has a different gateway (the external gateway) than the hypervisors VLAN IP, there will be no IP routing (it is only a L2 not an L3) so the  PREROUTING chain in table NAT will not be traversed by these packets.

To solve this issue we force these packets to traverse the IP routing with an ebtables rule like:

ebtables -t nat -I PREROUTING -p ipv4  –ip-dst 169.254.169.254 –ip-protocol 6 –ip-dport 80 -j redirect –redirect-target ACCEPT

Enjoy the ebtables! Find more examples and documentation in here.

Exposing Infiniband (or any PCI device) to the VMs on an OpenStack Cloud

For a recent project we (me and Wuming) had to provide an OpenStack cloud in which the raw infiniband protocol would be available to the VMs running on the cloud.

The installation was done on Ubuntu 14.04.3 with vanilla OpenStack. Exposing infiniband requires quite a few steps and reading/googling quite a bit so I will document it here in case somebody needs to do the same.

To expose the native hardware interfaces to the VM:

  • The BIOS of the computer has to support it (you may need to activate Intel VT-d (or AMD I/O Virtualization Technology), as with virtualization extensions, it may be off by default). Explore the BIOS of your servers to activate it if necessary;
  • The Infiniband cards themselves have to support it. Look for SR-IOV in an “lspci -v” output as below:

$ sudo lspci -v |grep -A40 Mellanox
04:00.0 Network controller: Mellanox Technologies MT27520 Family [ConnectX-3 Pro]
Subsystem: Hewlett-Packard Company Device 22f5
Flags: bus master, fast devsel, latency 0, IRQ 16
Memory at 96000000 (64-bit, non-prefetchable) [size=1M]
Memory at 94000000 (64-bit, prefetchable) [size=32M]
Capabilities: [40] Power Management version 3
Capabilities: [48] Vital Product Data
Capabilities: [9c] MSI-X: Enable+ Count=128 Masked-
Capabilities: [60] Express Endpoint, MSI 00
Capabilities: [100] Alternative Routing-ID Interpretation (ARI)
Capabilities: [148] Device Serial Number 24-be-05-ff-ff-b6-e3-40
Capabilities: [108] Single Root I/O Virtualization (SR-IOV)
Capabilities: [154] Advanced Error Reporting
Capabilities: [18c] #19
Kernel driver in use: mlx4_core


  • The kernel in linux needs to be configured by passing the option intel_iommu=on. You can do it by editing the file /etc/default/grub so that it contains the option GRUB_CMDLINE_LINUX_DEFAULT=”intel_iommu=on” and running update-grub;
  • The Infiniband cards need to be configured to expose the VFs. Edit the file /etc/modprobe.d/mlx4_core.conf to contain options like: options mlx4_core num_vfs=16 (or as high as your card supports. One VM will take one VF so this could be the limiting factor as of how many VMs can be deployed per compute node). You can find more documentation for the mellanox cards in the Mellanox Linux User Manual Mellanox_OFED_Linux_User_Manual_v3.10 or here since you may need to enable this option (in our case it was enabled already);
  • Nova has to be configured to allow pci passthrough. Follow the documentation in here on “How to prepare the environment”
    • Configure the nova (find the Virtualized Interfaces vendor_id and product_id for your case by running an lspci -vn)
    • Create a flavor that automatically adds the interface to the VM

And now… Just launch a VM and log in! You should see the Infiniband card!

A very nice overview talk on OpenStack HA

This talk: “Deep Dive Into a Highly Available OpenStack Architecture“, given at the recent OpenStack Summit in Vancouver, provides an unusual nice balance between overview and details!

It will provide you with a sound understanding of the architecture and services of OpenStack, specially the later, and how to make the OpenStack services Highly available.

It does not cover Heat or Ceilometer but once you understand the other services it is not complicated to use the same architectural concepts.

I highly recommend watching it!

How to fix an installation issue with the Openstack command line tools in OS X 10.9.5 and 10.9.4

If you follow the Openstack  command line client tools installation guide you will have an issue. For example to install the keystone tools (Mind root access, add sudo when needed):

#easy_install pip

#pip install python-keystoneclient

This will result in the error when trying to execute the tools (with nova you would get the same error!):

$ keystone –list

Traceback (most recent call last):

File “/usr/local/bin/keystone”, line 7, in <module>

from keystoneclient.shell import main

File “/Library/Python/2.7/site-packages/keystoneclient/__init__.py”, line 37, in <module>

__version__ = pbr.version.VersionInfo(‘python-keystoneclient’).version_string()

File “/Library/Python/2.7/site-packages/pbr/version.py”, line 78, in version_string

for part in self.release_string().split(‘.’):

File “/Library/Python/2.7/site-packages/pbr/version.py”, line 70, in release_string

self.release = self._get_version_from_pkg_resources()

File “/Library/Python/2.7/site-packages/pbr/version.py”, line 62, in _get_version_from_pkg_resources

return packaging.get_version(self.package)

File “/Library/Python/2.7/site-packages/pbr/packaging.py”, line 870, in get_version

raise Exception(“Versioning for this project requires either an sdist”

Exception: Versioning for this project requires either an sdist tarball, or access to an upstream git repository. Are you sure that git is installed?

The solution: install also the distribute package:

 pip install –upgrade distribute


Cloudlynx. A Highly Compliant and Secure Swiss Cloud

As the website for this new company Cloudlynx states. They are a Highly Compliant Swiss Cloud. They will go to an encrypted experience of the Cloud.

They will not have the problem with data being hosted in the US and thus being subject to the patriot act. For many European this should be attractive.

Also the privacy rules that characterise Switzerland should be very appealing.

Using Squid to pre-cache golden images in a mass scale

Abstract

Pre-caching images on nova-computes is a tricky issue that may be a big headache to an Openstack Administrator. Here at CERN we have put together a pre-caching system, that has enabled us to send a 1,7 GB image to 1300 servers in under 9 minutes. Keeping in mind the ease of maintenance and scalability at any amount, we wish to present this idea.

Description

Our major concern is the pre-caching of the images on nova-compute nodes. Glance is the central service that provides the infrastructure with VM images. One of the problems that Glance has to encounter, is the scaling of image deploying in large infrastructures. This issue has been addressed by the community with the pre-caching middleware, which stores Glance images on the OpenStack API servers. Here we present an alternative way that it is easy to maintain and deploy, is scalable and, most importantly, is based on existing and proven technologies. Before we present our idea, first we would like to give a brief description of our needs and use case.

The CMS experiment at CERN during the Long Shutdown, decided to “lend” its cluster on the GRID community for their experiments. The HLT (High Level Trigger) cluster is composed by 1300 servers that we want to provide to the GRID site, which include 1 Glance server with 1 Gbps link to the network, 4 servers that host all openstack services on failover with 2 Gbps link each and 1300 hypervisors (with more to come in the future) with 1 Gbps link each.

We have some very specific needs, and thus our utilization of OpenStack may not be the standard case of a cloud provider or any other organization that uses cloud. For instance:

  1. each server should run a single virtual machine that consumes all hypervisor’s resources

  2. we have a very small variety of images (1-3)

  3. we need to start and deploy VMs extremely fast

Despite these specifications, we believe that this presentation may help further develop the caching system in OpenStack.

Building blocks

This pre-caching system is external to OpenStack. This means that zero configurations and patching is needed to the source code, which implies that it can be backported to any version of OpenStack. It contains 2 python scripts, one installed at Glance’s side and the other one on each nova-compute node, an Apache httpd server and multiple squid servers deployed at key points at the infrastructure. In the following image you can see the a tree topology of the pre-caching system that we use in our case. Any kind of topology can be used, that fit the needs of a certain infrastructure.


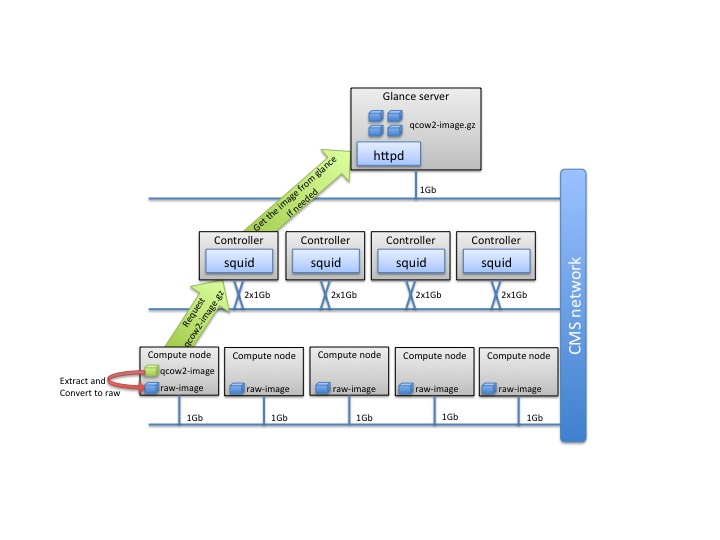
The Glance server hosts the httpd server where we are going to place our image, for pre-caching. The first python script provides a CLI through which one can declare the image-id that they want to pre-cache. The script finds the image, zips it with gzip and places it on the apache httpd folder.

The second step is to ask the nova-computes to fetch the image. At this point one could use the second script (which runs on the nova-compute side), which also provides a CLI which can take the image-id for caching as an input. The script will connect to the httpd server through the squid proxy. It will then retrieve the image and unzip it at the local folders of nova-compute.

Benchmarks

We put this idea to the test and the outcome was a great speedup, as expected. Below we present some numbers on image sizes, network traffic and time.

Image size:

Uncompressed

gzip -6

gzip -9

bzip2

Size

1341784064B

1.3GB

411246527B

393M

408981472B

391M

357287908B

341M

Zip Time

—————–

1m37s

6m58s

3m57s

Unzip Time

—————–

0m18s

0m18s

1m5s


Network traffic (used gzip -6):

No Squid

With Squid

With compression

393*8/1024*1300/60

= 66.52(1.1 Hour)

393*8/(1024*8)*1300/60

= 8.3 Minutes

Without compression

1300*8/1024*1300/60

= 220.05 Minutes(3.7 Hours)

1300*8/(1024*8)*1300/60

= 27.5 Minutes

image size * 8 to convert to bits / 1024(Gigabit connection) to get number of seconds to transfer one image * # nodes / 60 seconds / 60 minutes = hours to complete 
Glance server: 1 Gbps / Squid server: 2 Gbps / Nova node: 1 Gbps / # Nodes: 1300

Implementation details

In this section we would like to describe further the most important reason that has driven us to develop this system, based on technical details.

1. Why not OpenStack Glance caching

The reason that the OpenStack Glance caching doesn’t fit our needs, is that we demand the lowest possible start time for each VM. This can be done if the images are cached into the nova-compute nodes. Glance caching has no automatic way of pushing the image into the nova-compute nodes.

Glance pre-cache middleware does not support compression. In our case (you can see on the benchmark section the differences in the size), we earned a great benefit in network traffic by compressing the images.

2. Why Squid?

The HLT cluster is already using Squid, so it would be a waste of resources as well as an administrative overhead to install a bunch of additional services on top of the existing ones.

A second argument is that Squid provides a fine set of features that can give great flexibility to administrators regarding how they use the storage amount and policies, the network configuration and topology. Many of the squid features are not available through Glance cache.

There is a small catch using Squid as a medium to serve the images to the nova-compute nodes. When the images are prepared at the Glance side, and copied in the httpd directories, there is no way for them to be pushed to Squid servers. There is a workaround to this problem by sending a signal to a custom script on each Squid server and ask the server to fetch the images, but we thought that this would further complicate the pre-caching system to a great deal.

Instead, we decided to insert a random delay on the nova-compute requests, so that the first connection that will arrive to the squid server will work as a “warm-up” request for the Squid cache.

3. Why Gzip?

The major advantage of Gzip is its low time of decompression. Unlike bzip2, gzip is very fast, even though gzip is 8% less efficient in compressing the same image.

A second advantage of gzip, is its streaming properties (bzip2 can be used too, but as said above, it is slow). When we as a nova-compute to download the image through the Squid network, we uncompress the image at the same time to speed up the process.

4. Monitoring and cleaning?

We created a simple reporting system to help us track down which images are cached where.

Conclusion and future work

As a conclusion to this article we would like to sum up the differences between the current state of both Glance caching and our system, and a future plan.

This is a small table comparing the two frameworks:

Glance caching

CERN pre-caching System

Future Glance pre-caching

Images are distributed to API servers

Images are pushed to the nova-compute nodes

Images are pushed to the nova-compute nodes

No compression

Any kind of compression

Any kind of compression

Bind to specific OpenStack version

Can work with any OpenStack version

Merged with latest version but also can be used as an external system

API on Glance side

external API

API on Glance and nova-compute sides


Anastasios Andronidis, Olivier Chaze

The CMS online Cloud (redundant and grizzly reborn) in CHEP2013

I presented the details of our new cloud: “The CMS openstack, opportunistic, overlay, online-cluster Cloud (CMSooooCloud)” on the 20th International Conference on Computing in High Energy and Nuclear Physics (CHEP2013). Find there details on our easily scalable and redundant infrastructure implementation.

The CMS online Cloud (redundant and grizzly reborn)

In August, we put in production our new implementation of the CMS online Cloud. I will present the results of the efforts by Olivier Chaze, Wojciech and myself in CHEP2013.

The new CMS online Cloud features now a complete easily scalable and redundant infrastructure. We implemented:

  • RabbitMQ in cluster with replicated queues as described by RabbitMQ people in here;
  • MySQL cluster after modifying minimally the definition of the tables needed by the different OpenStack services;
  • Grizzly OpenStack services in active/active using the clusterware corosync/pacemaker and Round Robin aliases as an easy load balancer when needed (keystone, dashboard, APIs…). I want to thank here Florian Haas that gave me a guideline to develop the clusterware agent scripts for the different services.

This made our 1300 hypervisors (~13000 cores) cloud resilient to failures! The controlling infrastructure described briefly above scales nicely. I’ll post the link to the presentation after it is given.